Kerak Telor Recipe
Kerak telor is one of the most recognized Betawi traditional foods, predating Jakarta as a modern city. Historically recorded as a celebratory snack of the Betawi people since the colonial era, it was commonly served at traditional ceremonies and important community gatherings.What sets it apart is the cooking technique. The pan is tilted or inverted toward the heat source so the top of the batter dries and cooks without being flipped. No lid, no steam, no frying involved. The result is a thin, crispy, savory layer of sticky rice with a distinctive toasted coconut aroma.This recipe is a practical guide to making kerak telor at home. Using Whole Egg Powder and Salted Egg Powder from Accelist Pangan Nusantara, the process becomes more straightforward and the results more consistent, without relying on duck eggs that are not always easy to source locally.
Ingredients
Method
- Prepare the sticky rice: Drain the glutinous rice that has been soaked for at least 5 hours or overnight until no water drips from it. Adequate soaking ensures the rice cooks evenly and produces a chewy texture; rice that has not fully absorbed water will cook unevenly and result in a hard, unpleasant crust.
- Soak and grind the dried shrimp (ebi): Soak the dried shrimp in warm water for 10 minutes, then drain. Grind using a mortar and pestle or small blender until it forms a coarse powder, set aside.
- Dissolve the egg powders: Add 26 g of Accelist Whole Egg Powder to a bowl, pour in 78 ml of clean water, and stir slowly until fully dissolved with no lumps. Let it rest for 3 to 5 minutes to allow the mixture to hydrate properly. In a separate bowl, dissolve 20 g of Accelist Salted Egg Powder in 10 ml of warm water. This product is naturally rich in savory, salty flavor, so no additional salt is needed in this recipe unless, after tasting, the seasoning feels lacking. Stir until smooth and set aside.
- Toast the coconut: Heat a dry pan over low heat. Add the grated coconut and toast for 5 to 7 minutes, stirring occasionally, until it turns light golden and fragrant. Remove from heat and set aside.
- Prepare the egg batter: Add the ground dried shrimp, 2 tablespoons of toasted coconut, the dissolved Salted Egg Powder mixture, ground pepper, and sugar into the Whole Egg Powder solution. Stir until all ingredients are evenly combined.
- Cook the sticky rice base: Heat a flat non-stick pan between 18 and 20 cm in diameter over medium heat, avoid using a larger pan as it will spread the rice too thin, increasing the risk of burning before the egg batter has time to cook through. Add cooking oil and spread it across the entire surface. Pour in the drained sticky rice and flatten it into a thin, even layer covering the whole base of the pan. Reduce the heat to low and cook for 10 to 12 minutes until the bottom layer begins to dry and no longer sticks to the pan. Keep the heat consistently low throughout this stage. high heat will scorch the bottom while leaving the top underdone.
- Pour the egg batter: Once the sticky rice is half-cooked, pour the egg batter evenly over it. Use a spoon to spread the batter gently so it settles into the gaps between the rice grains. Scatter the remaining toasted coconut and 2 tablespoons of fried shallots across the surface.
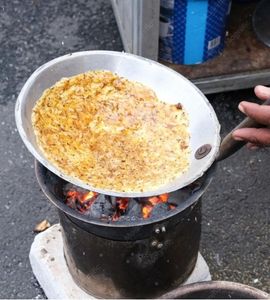
- Apply the traditional grilling technique: Do not cover the pan. Once the edges of the batter begin to dry and turn golden, carefully tilt the pan toward the heat source so the top surface of the batter is exposed to direct heat. This is the defining technique of kerak telor and what gives it its characteristic dry, crispy top. Allow the process to continue for 8 to 10 minutes. The kerak telor is ready when the entire surface is golden brown and the edges feel crispy when tested with a spatula.
- Serve: Remove the kerak telor from the pan and sprinkle with extra fried shallots to taste. Serve immediately while hot. Kerak telor is best enjoyed within 5 to 10 minutes of leaving the pan, when the sticky rice crust is still at its crispiest and the aroma is at its fullest.