
Industrial cake batter mixing is the blending stage that determines how much air gets incorporated into the batter before baking. Proper control at this stage covers batter temperature, specific gravity, and the mixing method used.
The ideal batter temperature after mixing falls between 68°F and 72°F (20°C to 22°C) to keep the emulsion stable and prevent incorporated air from escaping. That figure is the starting point before the mixing tips below come into play on the production floor.
This article covers why the mixing stage determines cake quality, followed by 7 practical tips production teams can apply on the floor, from choosing the right tool to integrating egg powder into the batter. Each tip comes with the technical reasoning behind it so it can be adapted to each facility’s own production line.
Why Does the Mixing Stage Determine Cake Quality?
The mixing stage determines a cake’s final quality because it is what builds the air structure inside the batter while also developing gluten from the flour. The more evenly air gets trapped, the lighter and softer the cake’s texture turns out after baking.
Mixer speed and duration affect how much air gets incorporated, while batter temperature determines how stable that air stays until baking begins. That combination is what separates a cake with a fine crumb from one that turns out dense or falls apart easily, which the tips below cover in more detail.
Tips for Industrial Cake Batter Mixing
There are 7 mixing tips production teams can apply to keep cake batter consistent from batch to batch, covering everything from temperature control to mixing in egg powder. The 7 tips below follow the order of an actual mixing process on the floor, from equipment setup through to raw material adjustments.
Tip 1: Choose the Right Mixing Tool (Whisk or Paddle) for the Batter
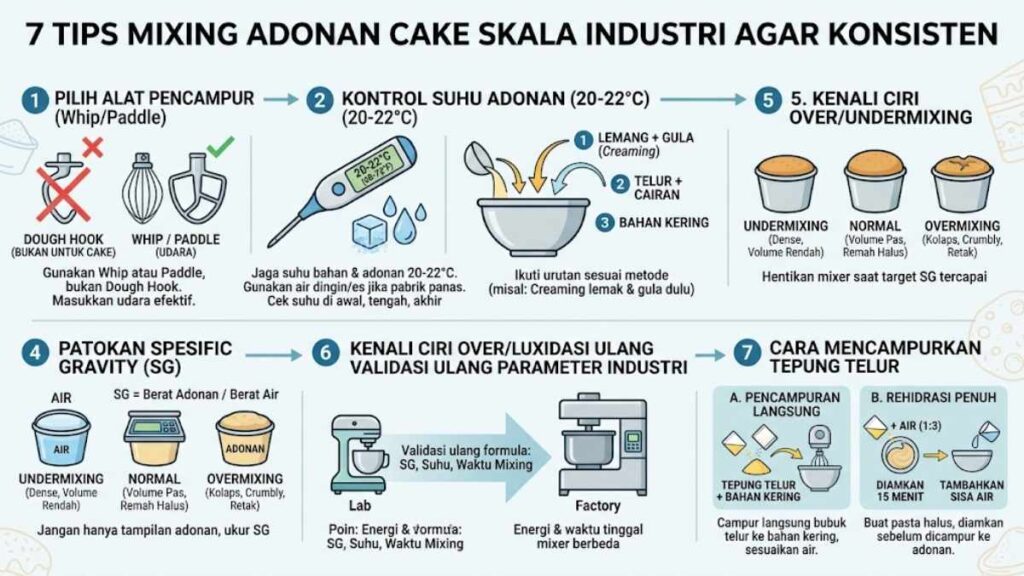
Use a wire whip or paddle attachment for cake batter instead of a dough hook, which is built for bread dough. A whip or paddle incorporates air into a liquid batter far more effectively, while a dough hook is designed to knead thick, elastic dough.
The mixer itself can often be the same unit used for bread dough, such as a vertical mixer or spiral mixer, as long as the attachment gets swapped out. Choosing the right tool from the start lowers the risk of under-aerated batter even when mixing time and speed already match the standard.
Tip 2: Control Batter Temperature Before and During Mixing
Keep batter temperature within 68°F to 72°F (20°C to 22°C) throughout mixing, including the temperature of raw materials like eggs, butter, and water before they go in. Batter that runs too warm lets incorporated air escape more easily before it ever reaches the oven.
Use ice or chilled water to bring batter temperature down when the plant floor runs hot, especially when mixing takes longer than 10 minutes. Check batter temperature with a digital thermometer at the start, middle, and end of mixing rather than only once at the beginning.
Tip 3: Pay Attention to Ingredient Order During Mixing
Follow an ingredient order that matches the mixing method in use, such as the creaming method, which beats fat and sugar together until light before eggs and dry ingredients go in gradually. That order determines how much air gets trapped before the batter turns too thick to hold any new air bubbles.
The single-stage method, which combines every ingredient at once, is faster but needs a strong enough emulsifier to keep air distributed evenly without staged beating. Pick the method that fits the recipe and mixer capacity, then apply that same order consistently across every batch.
Tip 4: Make Specific Gravity the Main Benchmark, Not Batter Appearance
Do not rely on batter appearance alone to judge whether mixing is done, since the eye often misjudges how much air has actually gone in. Measure specific gravity (SG) routinely and compare the result against the target SG for each cake type below.
| Cake Type | Target Specific Gravity |
|---|---|
| Angel food cake | 0.30 |
| Sponge cake | 0.50 |
| Devil’s food, white, or yellow cake | 0.70 |
| Pound cake | 0.80 |
| Cream cake | 0.85 |
| Chocolate cake | 0.90 |
Weigh batter and water in containers of the exact same size, then divide the batter weight by the water weight to get the SG figure, for example 80 grams of batter divided by 100 grams of water gives an SG of 0.80. If the SG reading is still far from target, continue mixing in stages while re-measuring every 1 to 2 minutes to avoid overmixing.
Tip 5: Recognize the Signs of Overmixing and Undermixing Early
Stop the mixer as soon as any of the following signs appear, since batter that keeps mixing after SG is reached only damages the air structure that has already formed. The table below sums up the easiest overmixing and undermixing signs to spot on the production floor.
| Sign | Overmixing (SG Too Low) | Undermixing (SG Too High) |
|---|---|---|
| Texture | Soft and crumbly | Dense and hard to bite |
| Volume | Starts high, then drops as air cells collapse | Low from the start due to insufficient air |
| Surface | Cracked, uneven shape | Flat but heavy, poor rise |
Log which sign shows up on every failed batch, then compare it against the SG reading recorded at that time to work out whether the issue lies in mixing duration or speed. That logging habit helps production teams correct the process faster than relying on memory alone.
Tip 6: Revalidate Parameters When a Formula Moves to an Industrial Mixer
Do not apply a formula proven on a small planetary mixer straight to a large-capacity continuous mixer without revalidating it first, since mixing energy and the batter’s residence time inside the mixer both change. Baking Business notes that specific gravity is one of the quality control measurements most often overlooked at exactly this validation stage.
Re-measure SG, batter temperature, and mixing time as soon as a formula moves to a continuous mixer, then compare the results against the SG readings recorded during small-scale trials. If the gap is too wide, adjust mixer speed or the batter’s residence time before moving on to full-scale production.
Tip 7: Adjust How Egg Powder Gets Mixed Into the Batter
Choose one of the two methods below for mixing egg powder into cake batter, depending on the production system already in place at the facility. Picking the right method helps prevent clumping while keeping batter consistency steady from batch to batch.
Blending Directly Into Dry Ingredients
Blend egg powder directly with other dry ingredients such as flour and sugar before mixing begins, following the method recommended by egg powder manufacturers. Add water to the recipe in an amount equal to what liquid egg would have contributed, so no separate rehydration step is needed.
This method works more efficiently for large-scale production lines since it cuts out one processing step and makes mixing easier to automate. Make sure mixing time and speed are sufficient for the egg powder to dissolve fully without leaving small clumps in the batter.
Fully Rehydrating Before Adding to the Batter
Mix egg powder with water at a ratio of 1 part powder to 3 parts water by weight if full rehydration is needed first, for example 1 kilogram of egg powder with 3 kilograms of water yields liquid equivalent to about 80 medium eggs. Form a smooth paste first, let it rest for about 15 minutes, then add the remaining water while whisking continuously until the texture is even before pouring it into the mixer.
Use the rehydrated liquid egg right away, or refrigerate it at 32°F to 39°F (0°C to 4°C) and use it within 24 hours to keep it safe. This method suits formulas that are already built to take fresh liquid egg rather than dry powder at the initial mixing stage.
Conclusion
The 7 tips above, from choosing the right equipment to controlling temperature to revalidating parameters at scale, help production teams keep cake batter consistent from batch to batch. Applying them routinely is far more effective than trying to fix a cake that has already failed after coming out of the oven.
How egg powder gets mixed into the batter, whether through direct blending into dry ingredients or full rehydration, also needs to match whatever production system is already in place. Choosing the right method helps prevent clumping while preserving the texture a cake is meant to have.

FAQ
Make sure the mixing attachment, such as a wire whip or paddle, is fitted and that raw material temperatures sit within 68°F to 72°F (20°C to 22°C) before mixing starts. Both steps form the baseline before moving on to specific gravity measurement.
Specific gravity measures how much air has gone into the batter, calculated by comparing the weight of the batter against the weight of water at the same volume. The lower the number, the more air has been successfully incorporated into the batter.
Stop the mixer immediately once signs of overmixing, such as a soft texture or a cracked surface, start to appear. Continuing to mix past that point only damages the air structure that has already formed.
An industrial mixer has different mixing energy, speed, and batter residence time compared with a small-scale mixer. That difference changes specific gravity and batter viscosity, so the formula needs to be re-measured before mass production begins.
The standard ratio is 1 part egg powder to 3 parts water by weight. One kilogram of egg powder combined with 3 kilograms of water yields liquid equivalent to about 80 medium eggs.